

Open shelving has become one of the most stylish and functional ways to decorate small spaces. Thin floating shelves, in particular, bring a sleek, modern look without overwhelming the room. Recently, while creating a cozy twin bed nook, I decided to install a set of DIY thin floating shelves using pre-made brackets. This project turned out to be simple, affordable, and highly rewarding.
Read More: From Dull to Dazzling: A Boring Dresser’s Jaw-Dropping Suitcase Makeover
In this guide, I’ll walk you through everything from choosing the right wood and brackets to cutting, staining, and installing the shelves. Whether you’re a beginner or a seasoned DIYer, you’ll find this tutorial easy to follow.
What Are Floating Shelves?
Floating shelves are wall-mounted shelves designed to appear as if they’re “floating” without visible supports. Traditional floating shelves rely on hidden hardware installed inside the wood. Thin floating shelves, however, often require a slightly different approach. Instead of hiding the brackets inside, they’re secured underneath, providing the same clean look with added strength and stability.

Why Choose Thin Floating Shelves?
For smaller areas like bed nooks, entryways, or bathrooms, traditional bulky shelves can feel overpowering. Thin floating shelves create a minimalist appearance that still offers plenty of storage and display space. They’re ideal for:
- Styling decorative items such as plants, candles, or books.
- Adding functionality without clutter.
- Creating symmetry and balance in small corners.
Materials and Tools Needed
The beauty of this project lies in its simplicity. You don’t need an entire workshop to get it done. Here’s what I used:
Materials

- Pre-made floating shelf brackets (set of 4)
- 12′ Spruce wood board (1″ thick, 8″ wide)
- Wood glue
- Stain or paint of choice
- Wood putty
- Tools
- Miter saw or circular saw
- Screwdriver or drill
- Sandpaper or power sander
- Level
- Stud finder
- Measuring tape
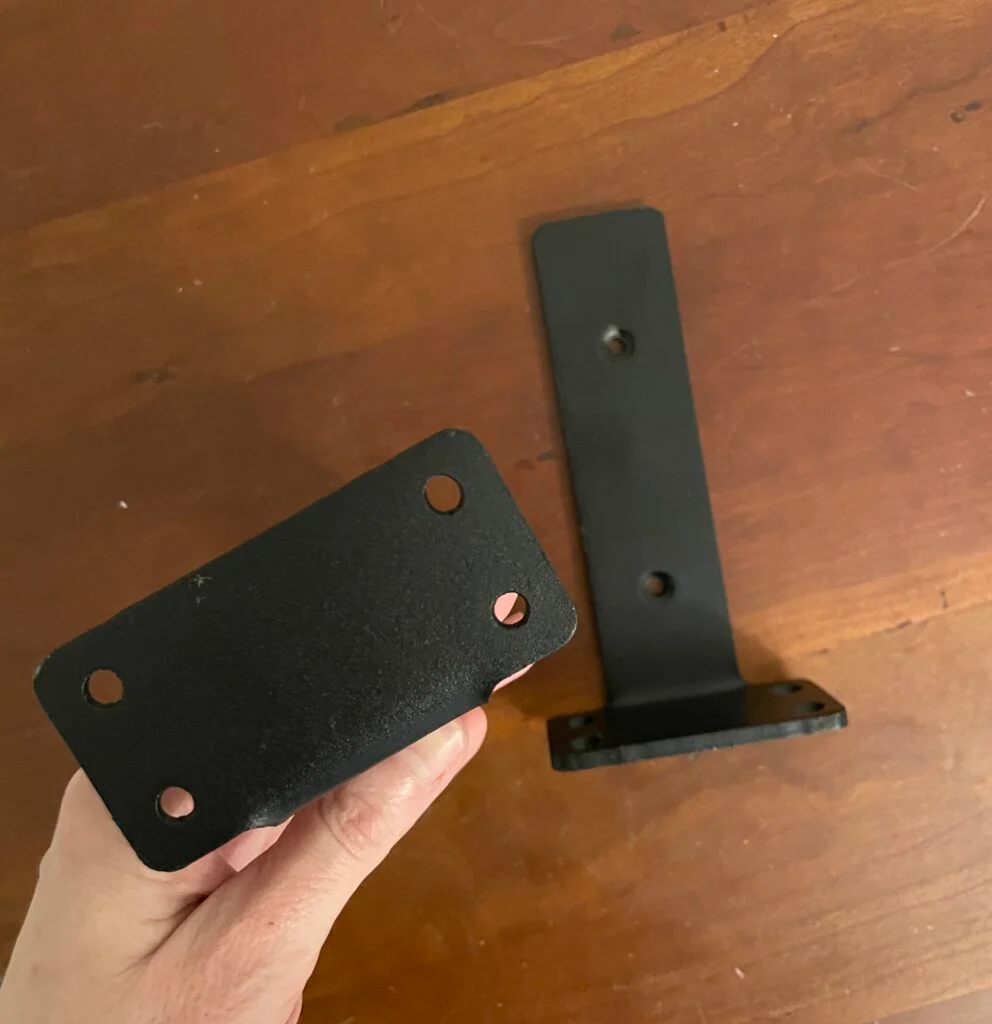
Choosing the Right Brackets
Instead of traditional floating hardware, I opted for pre-made shelf brackets designed to sit beneath the shelves. While these aren’t hidden inside the wood, they remain discreet once installed. More importantly, they offer extra strength.
Traditional hardware can weaken over time, especially if the shelves are bumped or overloaded. By using brackets that support the bottom of the shelf, I gained both sturdiness and peace of mind.
Selecting and Preparing the Wood

I chose Spruce wood because it’s affordable, easy to cut, and stains beautifully. The hardware store cut the 12′ board into manageable 3′ sections for me. Since the boards were only 1″ thick, I glued two pieces together to create a sturdier 2″ shelf.
Here’s the step-by-step process:
- Glue the boards – Apply wood glue evenly and clamp them together until dry.
- Cut to size – Once the glue set, I cut the boards down to the final length using a miter saw.
- Fill imperfections – Any gaps were patched with wood putty.
- Sand thoroughly – Smooth the surfaces with sandpaper to prepare for stain or paint.
Staining and Painting the Shelves

Spruce can sometimes absorb stain unevenly, so I used a careful technique to achieve a rich finish. I combined two stain colors for depth, then painted the ends and edges with a neutral latex paint to create a more polished look.
If you prefer a rustic finish, stick with stain. For a modern style, paint the shelves in white, black, or another bold tone.
Installing the Thin Floating Shelves
- Installation was straightforward, but accuracy is everything when it comes to hanging shelves. Here’s how I did it:
- Find the studs – Using a stud finder, I located wall studs where the brackets would be secured. Anchoring into studs ensures long-lasting support.
- Mark the placement – With a level and measuring tape, I marked the exact positions for each bracket.
- Pre-drill holes – I drilled pilot holes to prevent the wood from splitting.
- Attach the brackets – Using the provided screws, I fastened the brackets to the wall.
- Secure the shelves – Finally, I set the shelves on top and attached them to the brackets with shorter screws from underneath.
- Pro Tip: Install the top shelf first, then work downward. This makes it easier to secure the lower brackets without obstruction.
The Finished Look

Once installed, the thin floating shelves instantly elevated my twin bed nook. The natural wood added warmth, while the slim design kept the space open and uncluttered. Despite being only 3′ long, the shelves feel strong and functional thanks to the pre-made brackets.
What I love most is their versatility. You can easily adapt this tutorial to create shelves of any length or finish, whether you’re styling a living room, kitchen, or hallway.
Benefits of Using Pre-Made Brackets
- Ease of use – No complicated joinery or hidden hardware required.
- Strength – Bottom-support brackets hold more weight compared to traditional floating hardware.
- Flexibility – Works with different wood types and thicknesses.
- Beginner-friendly – Requires only basic tools like a saw, drill, and screwdriver.
Decorating Ideas for Thin Floating Shelves
Once your shelves are installed, the fun begins—styling them! Here are a few ideas:
- Add small potted plants for a fresh, natural look.
- Display framed photos or artwork.
- Stack a few favorite books alongside decorative bookends.
- Use baskets or jars for practical storage.
- Mix textures—ceramics, wood, and textiles—for a curated feel.
Maintenance Tips
Thin floating shelves are easy to maintain, but here are a few quick reminders:
- Avoid overloading with heavy objects.
- Dust regularly to keep the finish looking clean.
- Re-tighten screws annually if needed.
- Refresh with a new coat of stain or paint if the wood dulls over time.
Frequently Asked Questions:
Are thin floating shelves strong enough to hold heavy items?
Yes, when installed with sturdy pre-made brackets and secured into wall studs, thin floating shelves can hold a surprising amount of weight. However, always check the weight capacity of your specific brackets.
What type of wood is best for thin floating shelves?
Spruce, pine, and oak are popular choices. Spruce and pine are affordable and easy to cut, while oak is stronger and ideal for heavier loads. Choose stainable or paintable wood for the best finish.
Do I need special tools to install thin floating shelves?
No, this project is beginner-friendly. A saw (miter or circular), drill or screwdriver, stud finder, and level are typically all you need.
Can I install thin floating shelves without drilling into studs?
It’s possible with heavy-duty wall anchors, but shelves are far sturdier when mounted into studs. For safety and durability, studs are always recommended.
How do I hide shelf brackets for a cleaner look?
With thin shelves, brackets usually sit beneath the wood. While not fully hidden, they remain discreet and blend into the design. You can paint the brackets to match your wall or shelf for a seamless appearance.
How do I style thin floating shelves in small spaces?
Keep styling minimal. Add a few plants, small photo frames, candles, or books. Mixing textures—like ceramics, wood, and glass—adds depth without clutter.
Can I customize the length of my shelves?
Yes, pre-made brackets allow flexibility in shelf length. Simply cut the wood to your desired size before installation.
Conclusion
DIY thin floating shelves with ready-made brackets are one of the easiest and most stylish ways to enhance any room. They’re affordable, beginner-friendly, and strong enough to provide both function and beauty. With just a few basic tools, quality wood, and pre-made hardware, you can create shelves that look custom-built without the stress of complex carpentry. Whether you’re designing a cozy nook, updating a bathroom, or adding storage to a hallway, these shelves instantly elevate your space with a modern, minimalist touch. The best part? You can fully customize the size, finish, and placement to suit your home’s unique style.